Kubernetes and .NET running on a Raspberry Pi Cluster
I'm starting writing this blog post on the train ride home from yet another amazing DDD event! This variant being DDD South West in Bristol! For those that haven't heard of DDD - there are various DDD conferences throughout the world - with quite a few in the UK. They are always free, and always on a Saturday. This means that it tends to attract developers who are genuinely passionate about software development, and more than happy to give up their weekend to be part of this awesome community.
This will be the third time I've spoken at a DDD conference - the other two times were with my Developer Productivity talk. This time I was talking about Docker, Kubernetes, and running Kubernetes on a cluster of Raspberry Pis! And we had real hardware! This blog post covers everything I covered in the talk, as well as links to the hardware and tools used.
Update: The talk as other venues (plus video and photos)
Since initially writing this post, I've done this talk at a couple of other venues on-top of the above-mentioned DDD conference.
In August 2019, I did a 90-minute version at .NET Oxford. This was actually recorded, so if you prefer to watch rather than read, the video is below...
(please excuse my facial expression in that cover photo - I didn't pick it!)
I cover exactly the same content in both the video, and this blog post. Plenty of photos can also be found here.
I also did the same talk down in Southampton in October 2019 at Dev South Coast.
But, Why?!
So why install Kubernetes on a Raspberry Pi cluster? Well, why not?! To be fair, other than a bit of fun - there's no real reason why you'd do this. Scott Hanselman wrote a blog post a few years ago where he did the similar, and quite a few people have also done the same and built all sorts of interesting Raspberry Pi K8S clusters. I wanted an excuse to have a play, and thought it would make a nice talk at .NET Oxford.
I initially planned on doing this first at .NET Oxford, but then saw a tweet from DDDSW saying that talk submissions had opened, and I couldn't resist submitting it. It brought the timeframe of writing the talk forward a bit, but I still had a couple of month's at the time, and it meant I could rely on reverse-Parkinson's Law to get in done in time! :)
In reality, if you're going to use Kubernetes, and you have no restriction saying that you can't use the cloud - then I'd highly recommend going with a managed cluster - eg. AKS. However, if you have to create your own cluster for whatever reason, then whilst you probably wouldn't do it on Raspberry Pis - the process is pretty similar.
The Agenda
I started off going over the agenda for the talk. I'll follow a similar format in this blog post, and structure it in the same order as the talk. Here are the bullets from my agenda slide...
- Hardware Overview
- Create basic .NET app, running locally with Docker and Docker-Compose
- Intro to Kubernetes
- How to install Kubernetes on the Raspberry Pis
- Running our .NET apps on the Raspberry Pi Cluster
Hardware Sponsor
I would like to say a massive thank you ModMyPi for sponsoring my talk by providing the Raspberry Pis, cases, and SD cards! If you're interested in Raspberry Pis, Arduinos, etc - then definitely check out their site! Not only an online store, but they also have forums and tutorials with tons of interesting info. They're on Twitter too.
Hardware Details
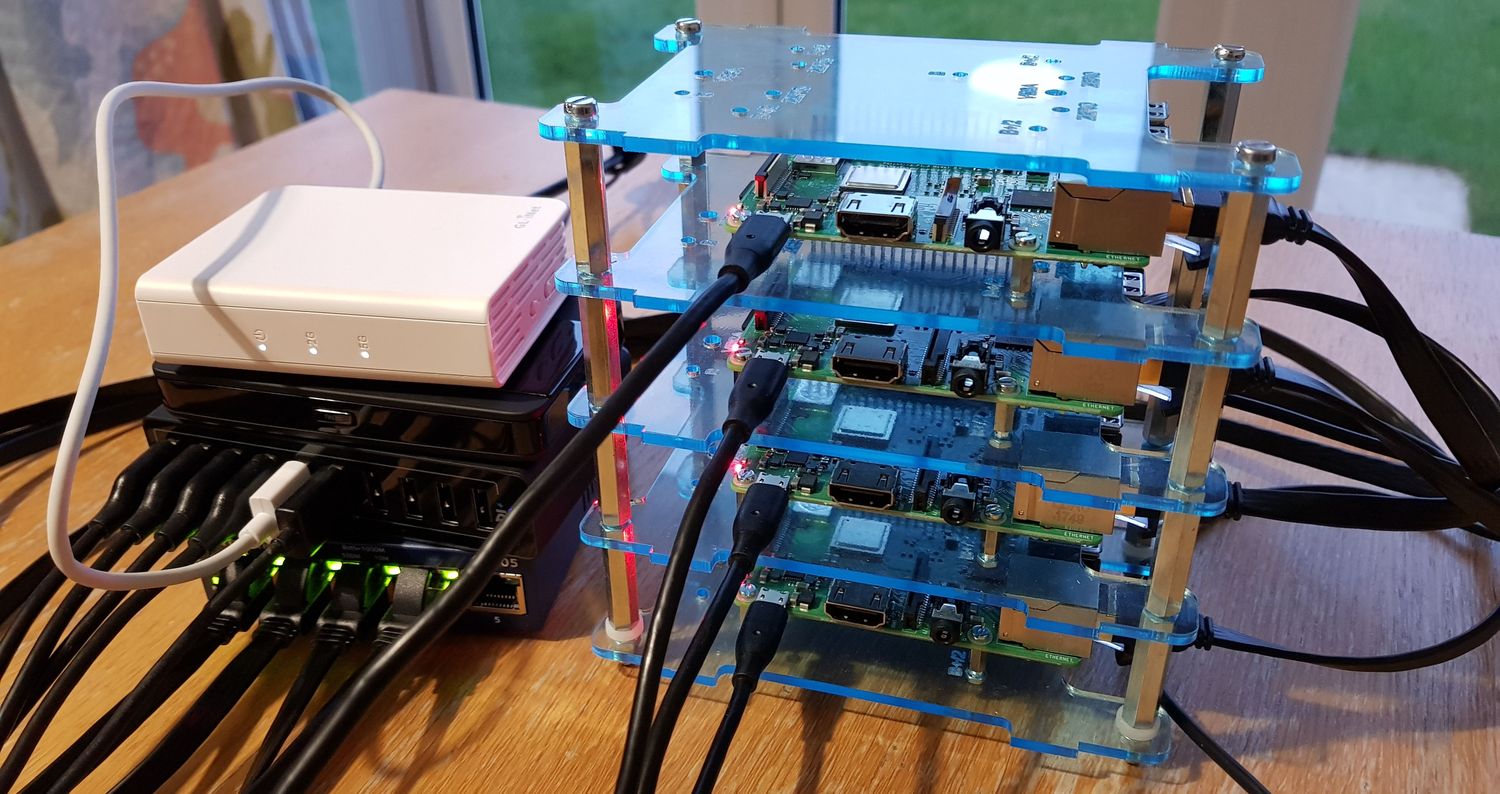
Below is a list of the hardware that was very kindly provided by ModMyPi...
- 4x Raspberry Pi 3B+ (this model has an ethernet port)
- 2x Stackable Cases
- 1x bolt pack (for spares)
- 4x 8GB SD cards
And here's the additional bits provided by my company, Everstack Ltd...
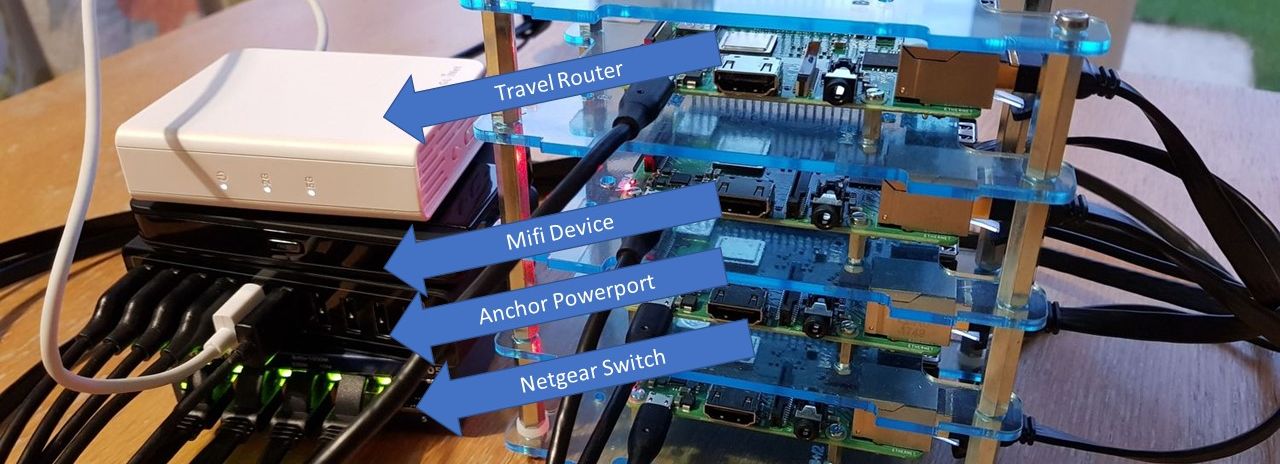
- GL.iNet GL-AR750 Travel AC Router (thanks to Joel for suggesting this)
- NETGEAR GS105UK 5-Port Gigabit Switch (because the router only has 2 internal ethernet ports)
- Anker Powerport to power the Pis and router
- 5x ethernet cables (flat design)
- 2x 3pack of micro usb charging cables
- TP-Link M7350 4G LTE MiFi (because the venue didn't have internet)
The 3B+ model of the Pis contain an ethernet port. Whilst I could have done this via wifi - I wanted to use cables to make it a bit more reliable.
Each stackable case can hold two Pis, so I needed two of these for my 4xPi cluster. Here's my tweet with pictures from when was assembling the cases...
A bit of lunch-time Pi assembly in preparation for my Kubernetes Pi talk! Now I just need some cables and a USB power adapter - which should be arriving today! A massive thank you to @thetuftii and @Pi_Borg for providing the hardware as sponsorship! pic.twitter.com/6nts3Wq0WB
— Dan Clarke (@dracan) April 12, 2019
The travel router is tiny, and can connect to an external network either via wifi or wired. And it's fairly well featured too, coming with OpenWrt pre-installed. This allowed me to connect to an external network, and then create my own private network to connect both my laptop and the Raspberry Pis to. As it only has 2 internal ethernet ports, I connected it to the Netgear switch, and plugged the Pis into the switch. My laptop then connected to the network (ie. travel router) via wifi. Unfortunately, the conference didn't have wifi - so I used the above-mentioned TP-Link Mifi device. The travel router connected to this mifi device for its external network.
The Pis and travel router then plugged into the Anker Powerport via USB for power. It turns out I should have also plugged in the mifi device to the Powerport, as you'll see later!
Creating the .NET applications
After introing the hardware, I wanted to start off creating the application we were going to run in the cluster. This was just a very simple 'hello world' messaging architecture to demonstrate how easy it is to have one service publishing a message onto a queue, and another service subscribing to the queue to perform some action when a message is published. The reason I wanted to do this, was that it shows multiple 'services' talking to each other allowing me to demo running multiple containers in our Kubernetes cluster - ie. two of our own containers, and a 3rd-party message queue container.
Here is a diagram showing the architecture we created during the talk...
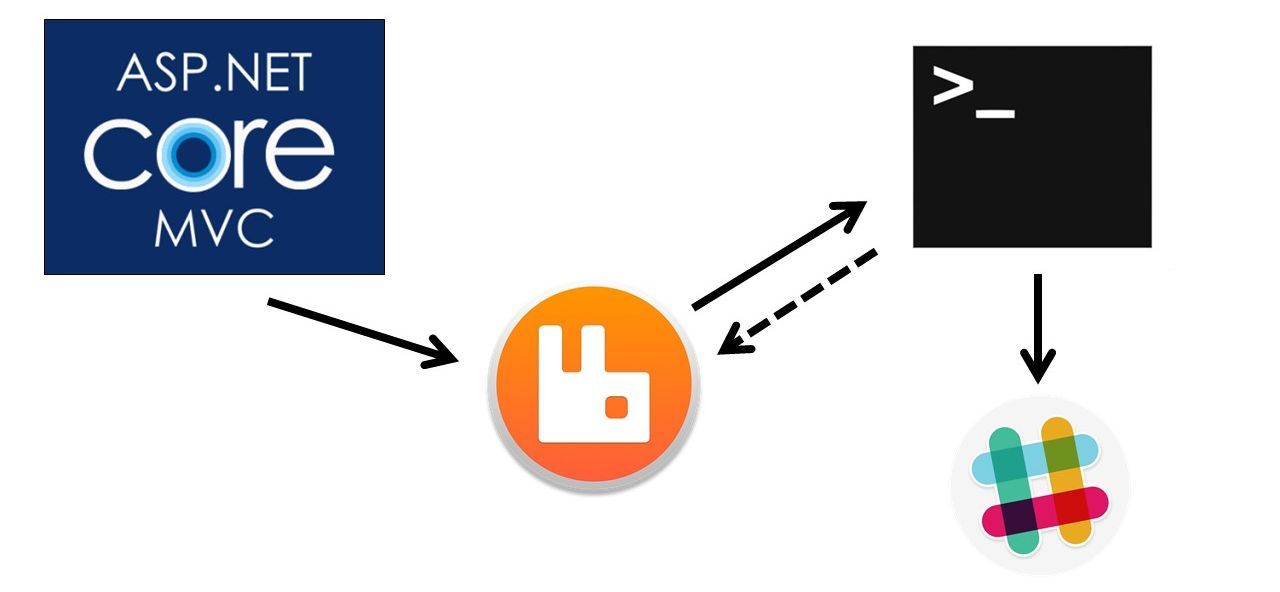
When we click on a link in the mvc application, it'll publish a message on a RabbitMQ message queue, then the console application will react to it by sending a message to Slack. The full source-code we ended up with at the end can be found on Github.
I used the .NET CLI to create both the 'web' and 'worker' projects...
dotnet new mvc -o web
dotnet new console -o worker
This took seconds, and we could then run them with dotnet run. Whilst this is the same as using "File..New" in Visual Studio - I wanted to demonstrate how quick and easy life is using the CLI!
Adding the RabbitMQ.Client nuget package is then as simple as running dotnet add package RabbitMQ.Client against each project.
I then had to cheat a little (as no-one wants to watch me type boiler plate code!), and copy a couple of "here's one I made earlier" helper classes into our projects: RabbitMQHelper.cs and SlackHelper.cs. The RabbitMQHelper has Send and Subscribe methods, and the SlackHelper just has a SendMessage method. I pointed out that these were static classes just to keep the demo very simple - I would always avoid doing this in production code, as it glues this code to the calling code, meaning that the calling code isn't very testable. For this demo though, this wasn't an issue.
To avoid having to manually create a hyperlink on the webpage, I just called the RabbitMQHelper.Send() method from the stock "Privacy" page, so our message got put on the queue each time you visited that page in the navbar. Then from the 'worker' console app project, we called RabbitMQHelper.Subscribe(..) to react to that message and post a message to Slack. We just sent "Hello DDD!" as the message to keep it simple.
Running RabbitMQ using Docker
So now our basic application is complete, but we're missing something quite important! We don't have an instance of RabbitMQ to send messages to or subscribe to! This is easily rectified thanks to Docker by running docker run -p 5672:5672 rabbitmq. In this section of the talk, I also explained at a high level, what containers and images were, and explained remote image registries. I won't repeat that here though, as there's a ton of info on the internet about this already.
After running the above command, we then had an instance of RabbitMQ running on my laptop! Which I can get rid of by just killing the container. No installations messing up my operating system or Windows registry - just a nice clean sandboxed container running it.
I use a command-line tool called Cmder, which I used in the talk. This gives a much better command-line experience to what you currently get out of the box with Windows (perhaps up until the new Windows Terminal announcement anyway!). You're still using the shell of your choosing (eg. cmd, Powershell, or Bash), but it adds a whole heap of options - eg. tabs, split-screen panes, etc. For more information, see my blog post Getting more from the Windows Command Line and search for 'ComEmu'. Note that I've recently switched from ConEmu to Cmder, as IMO it looks better - however they're pretty much the same thing, as Cmder is built upon ComEmu. That blog post describes ComEmu, but the same concepts apply.
I used Cmder's split screen view to very quickly create three panes (ctrl-shift-e for horizontal split, and ctrl-shift-o for vertical). The left-hand pane had the RabbitMQ output from Docker running, and I then used the right-hand two panes to run our MVC app and console app with dotnet run.
Clicking on the Privacy link in the webpage, then successfully popped up a Slack notification with our message. So we'd now seen the application working locally end-to-end on my laptop outside of Docker (except for the RabbitMQ instance which was with Docker).

Running our app inside Docker too
The next step in the story was to run the whole thing in Docker. For this, I obviously had to explain how to build Docker images. So I added the pre-made Dockerfiles, and explained how this worked. See here for the web Dockerfile, and here for the worker Dockerfile. They are multi-stage Docker files, so I also explained what this was. If you haven't used them before, see my blog post about multi-stage Docker files.
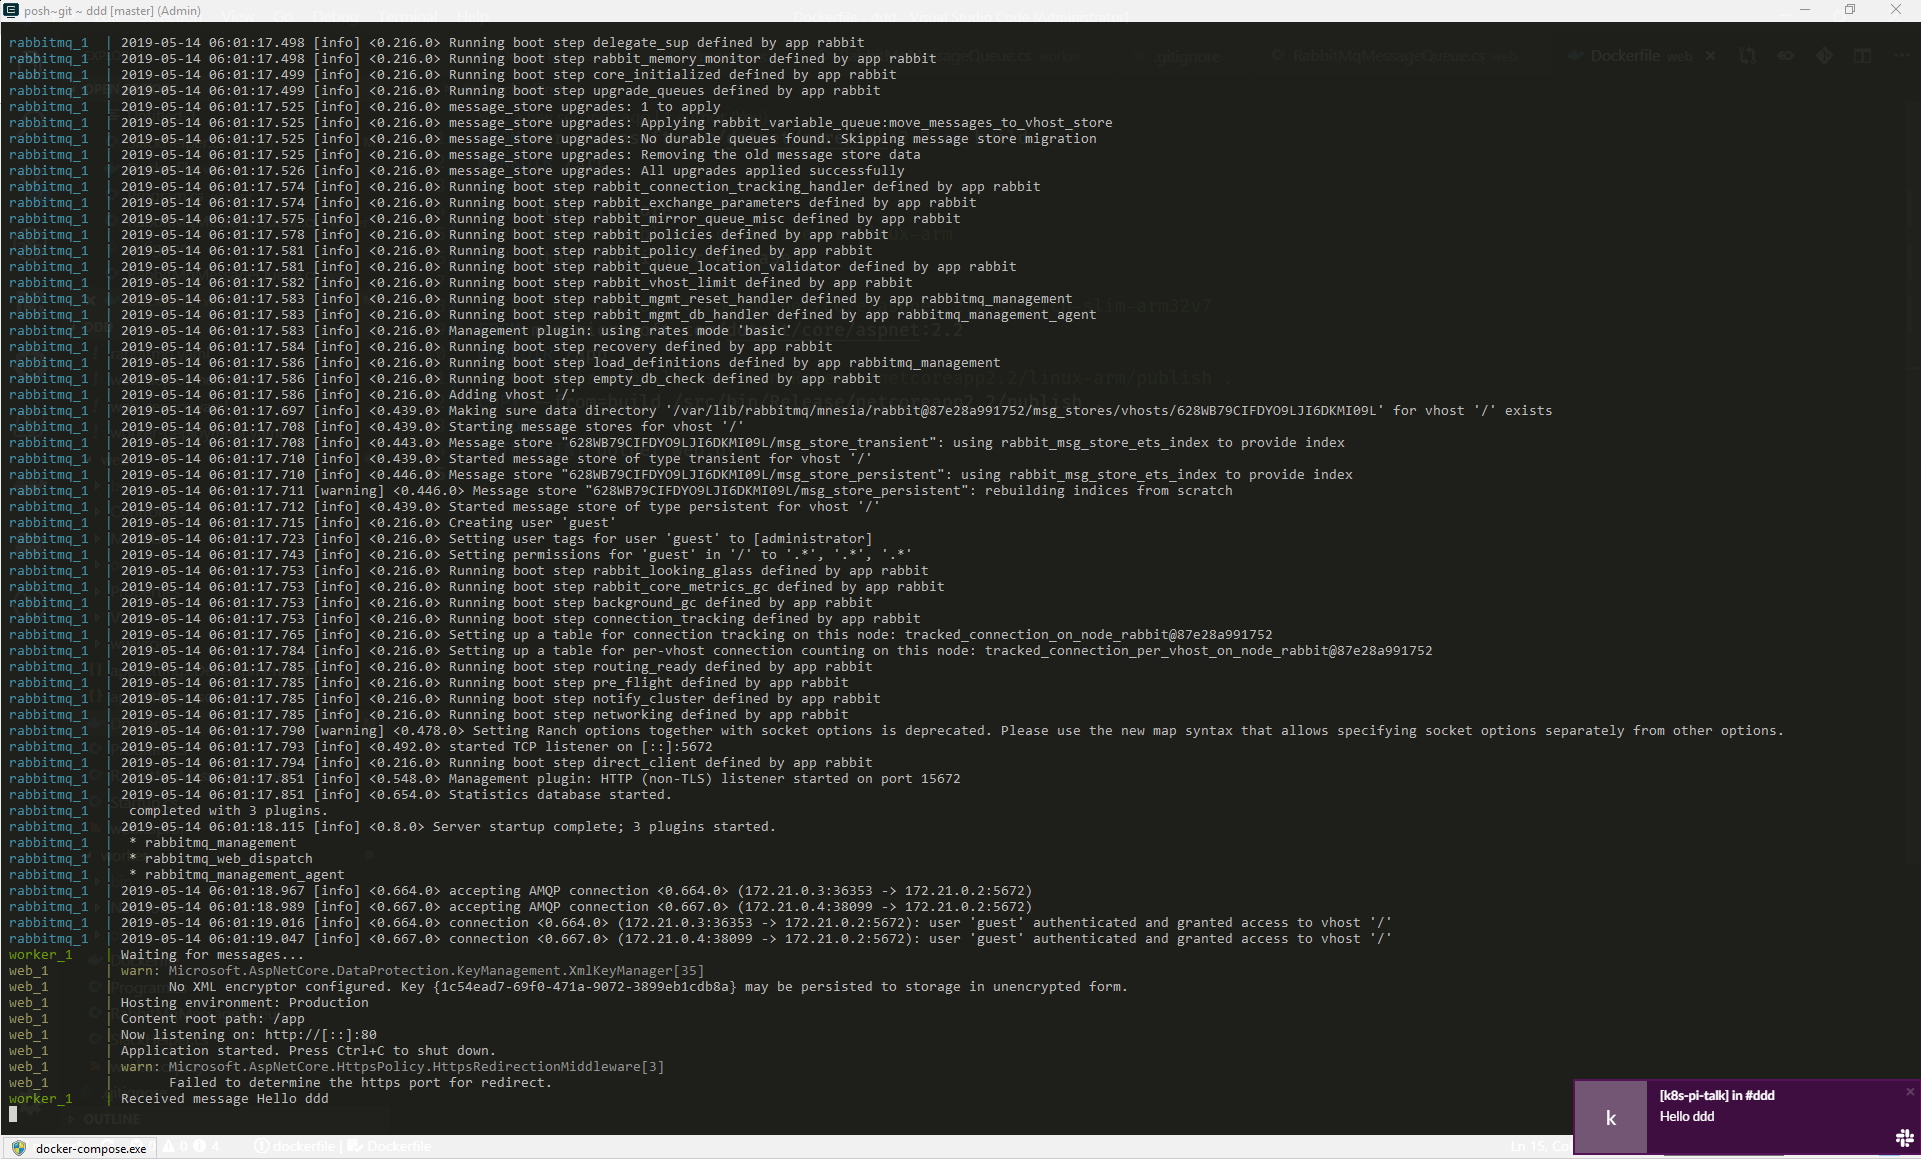
Given we have a few different components to our simple 'hello world' app - eg. the MVC app, the console app, and RabbitMQ - I used Docker Compose to both run, build, and push our images. I explained how Docker Compose works, and then ran our application with docker-compose up --build. See here for the docker-compose.yaml file.
One small change I had to make first was to change the RabbitMQ server hostname that both our mvc and console app was using from localhost to rabbitmq. This is because when our .NET app is running locally outside of Docker, it can talk to RabbitMQ with localhost - however, when running inside of Docker, where each component (ie. webapp, consoleapp, and RabbitMQ) are in their own containers - "localhost" for each will only be looking inside the container's localhost. When running a bunch of services with Docker Compose - each name you give each service, becomes a DNS entry. I had named the RabbitMQ service "rabbitmq" - hence why I had to change localhost to rabbitmq.
Again, this now successfully worked - now showing our application working end-to-end all within Docker (albeit, still on my laptop at this point).
Tweaking our images for ARM, then pushing to Docker Hub
Before pushing our web and console app images to Docker Hub for our Kubernetes cluster to pull down - there was one small change I had to make...
Up until now, we'd built our application for the default runtime, which won't run on an ARM processor. This is easily fixed, by editing our Dockerfiles and appending the RUN dotnet publish -c Release command with -r linux-arm to specify the Linux ARM runtime. I also had to change the base-image that our Dockerfile used to use the 2.2-stretch-slim-arm32v7 tag. See the commented out lines in our previously-mentioned Docker files.
I then rebuilt our images and pushed them to DockerHub using our docker-compose.yaml file by just running docker-compose push. I was expecting this to take quite a while, so I then left that uploading whilst I talked about Kubernetes...
Explaining Kubernetes
![]()
The next section in the talk was explaining what Kubernetes is, and also a few key bits of terminology. Running your apps using Docker locally is really easy, but there's much more to think about when running in production. You don't want all your applications running on just a single machine, as if that machine dies - then so does your app. This is where a container orchestrator comes in - where Kubernetes is by far the most popular. It basically allows you to run your containers on a cluster of machines (called a Kubernetes cluster). Kubernetes will then manage which machine your container runs on, ensuring that pods with multiple replicas (ie. pods that have been scaled out) are created across multiple machines in the cluster where possible. Kubernetes also managed health monitoring, so if I pod goes down, Kubernetes will recreate it - constantly making sure that your cluster matches the desired state you specified for your environment. Kubernetes also does a ton of other stuff, eg. load balancing, auto-scaling, and much more.
After explaining what Kubernetes was, I went through explaining what some of the core Kubernetes objects (resource types) are - eg. 'pods', 'deployments', and deployments 'services'. There are many more, but those are the main ones required for understanding the rest of the talk. I also explained other terminology - eg. what a node is, what the master node is, etc. I won't repeat this here as Kubernetes already has excellent documentation on this which goes into far more detail that I went into in the talk.
I then talked about how you interact with your Kubernetes cluster. Kubernetes provides a command line tool called Kubectl which you can use to run commands against your cluster. Once you understand the core concepts, it becomes really quite intuitive. A lot of the commands follow the same pattern - eg. kubectl <verb> <noun>. For example, to get a list of all your pods, you can type kubectl get pods. To get a list of all your services, you can type kubectl get services. To delete a pod, you can type kubectl delete pod <podname>. You get the idea.
In the same way as I described earlier for the docker-compose.yaml file - Kubernetes also has a YAML format for describing Kubernetes objects. This means that in these YAML files, you can describe the application environment, and source-control this desired state. The yaml files I used can be found here, and can be applied to the cluster using kubectl apply -f . to apply all yaml files in the currently folder, or kubectl apply -f <filename.yaml> to apply a specific file.
Explaining the installation process of Kubernetes on the Raspberry Pi
So far, we've discussed the hardware, and created an app to run on the hardware - but we haven't covered how to install Kubernetes on a cluster of Raspberry Pis. This is actually really easy. Below are the steps, which I'll then explain in more detail...
- Download Raspbian ISO file
- Use Etcher to flash that ISO to one of the SD cards
- Create an empty file called 'ssh' on the root of the SD card
- Plug the SD card into into the Pi, and turn on the Pi
- Find out the IP address of the Pi by checking your router dashboard
- SSH into the Pi (I use SuperPutty). Default username/password is pi/raspberry.
- Change the Pi's hostname from
raspberryto something unqiue. I didpi-masterfor my master node, thenpi-nodeNfor the three worker nodes. - Give each Pi a static IP address rather than the default DHCP
- Install Kubernetes using the scripts I mention below
I talked through these steps in the talk, but because of the limited time available, I had done them in advance before the talk. Here are the steps in a bit more details...
Download the Raspbian Linux Distro
I used a Linux distro called Raspbian, which is designed for Raspberry Pis. You can download the 'Raspbian Stretch Lite' ISO for this distro from here.
Flash ISO onto SD card with Etcher
Etcher is an open-source tool (built with Electron) making it easy to flash an ISO to an SD card, and it's available on Windows, Linux, and Mac. The GUI couldn't be more simple - just select your Raspbian ISO, your SD card drive, and click the "Flash" button.
Create empty 'ssh' file
By default, SSH mode isn't enabled on Raspbian. To avoid having to plug in a keyboard and screen to each Raspberry Pi, just create an empty file called ssh on the root of your SD card after you flashing it. You'll then be able to SSH straight onto the Pi.
SSH onto the Pi
Now you can just plug in the SD card into the Raspberry Pi, and turn it on. When it boots up, it'll initially have a DHCP IP address. You can find out what IP address it was assigned by looking at your router's dashboard to see the connected machines. For SSH, I use a tool called SuperPutty, which is a GUI wrapper around Putty that has a multi-tab interface and better connection bookmarking support. Enter the IP address of the Pi, then use the default Raspbian username and password of 'pi' and 'raspberry'.
Change default hostname
The default hostname is raspberrypi. Obviously having 4 Pis with the name hostname isn't great! So let's change this. There are two files you need to edit: /etc/hostname, which literally just contains the hostname; and /etc/hosts.
Change to a static IP address
To keep things simple, let's also assign a static IP address so things don't change under our feet. To do this, just add the following block of code to the bottom of the existing file called /etc/dhcpcd.conf...
interface eth0
static ip_address=192.168.8.100/24
static routers=192.168.8.1
static domain_name_servers=192.168.8.1
Where the 192.168.8 part is the subnet for the router's network, and I assigned the Raspberry Pi IP addresses from 192.168.8.100 to 192.168.8.103.
Installing Kubernetes
Once done, we now just need to install Kubernetes itself. Below are the two files I used - InstallKubernetes.sh and InitMaster.sh. InstallKubernetes.sh is run on each Raspberry Pi, and installs both Docker and Kubernetes. Then for just the master node, after running InstallKubernetes.sh and rebooting - also run InitMaster.sh to setup the master node. I use WinSCP to copy these files onto the Pi, and the above-mentioned SuperPutty tool I use for SSH has a nice WinSCP integration, allowing me to right-click on my bookmark and immediately create a WinSCP session!
In the talk, I went through the script explaining each bit, but I won't do that here, as a lot of the code from these bash setup scripts have been borrowed from this Github repository, which has quite detailed information in its GUIDE.md file explaining the different commands. A big thanks to Alex Ellis for this Github repo - it was a great help!
After you've run the InitMaster.sh script, the console output will mention a "join" command to copy. Make sure you make a note of this. You can then run this command on the other nodes to get them to join the cluster.
And that's it! You now have a fully working Kubernetes cluster running on a cluster of Raspberry Pis!
Accessing the Cluster remotely
Next, we need to access the cluster remotely - in my case, from my laptop. I already have the Kubectl command line tool installed locally (it came with Docker). But how do I point it at (and authenticate it with) my Raspberry Pi cluster? If you look back at the InitMaster.sh script above, you'll see that a file called admin.conf is copied to the $HOME/.kube/config folder. You'll need to copy that from the master node (I just used the above-mentioned Winscp to tranfer the file to my laptop). Copy it to your C:\Users\<username>\.kube folder (sorry, I don't know the Mac equivilant). Obviously if you're already using Kubernetes for other stuff, you'll have to merge it with your existing config file instead of overwriting it! Perhaps create a backup of your existing config file before doing this.
Once done, the kubectl commands should interact directly with our Raspberry Pi cluster!
The Demo Gods come to play :(

So now, we've seen our application working and posting to Slack locally - both inside and outside of Docker. The next step is to apply our YAML files to the Raspberry Pi cluster to run our application on our Raspberry Pis! We do this just via the kubectl apply -f . command I mentioned above.
Unfortunately, after explaining Kubernetes, I switched back to the command line where I had left the Docker images being pushed to Docker Hub - and it had timed out due to having no internet!! I checked my mifi device to find that the battery had gone flat! This was the first time I'd used it, so it was surprising that the battery didn't last long at all. In fact, using it since then, strangely, it seems to last much longer.
As we were right at the very end of the hour at this stage, I didn't have time to fix the issue. Frustrating as it was, at least everyone had seen the app running locally on my laptop, and also saw all the steps required for it to run on the Raspberry Pi cluster. It was just the final demo showing it actually working that failed. So really, there wasn't any actual content missed other than seeing a Slack notification message appear - which the audience had already seen working.
Lessons learn for next time I do the talk
The obvious lesson learnt would be to plug my mifi device into the Anchor USB powerblock that was sat just a few inches away from it anyway! ;) But other than that - I had tried to pack an awful lot into a single hour. Luckily, when I do this talk in August at .NET Oxford, I have the entire night (ie. an hour an a half), which feels a much better time for the talk. I'd also like to do more with the Raspberry Pis themselves. Perhaps adding some LEDs into the mix, indicating what Pi our containers are running on. Given the extra time I have at .NET Oxford - I'd also like to demonstrate randomly unplugging the Pis, showing that our application still stays up.
Even with the demo failure at the end, I still had fantastic feedback from the audience via the PocketDDD app that the conference was using for feedback. A massive thank you to everyone who came to the talk and gave such amazing feedback - you're all awesome :)
Links and References
- Our final code for our C# 'hello world' app
- Slides
- The Github project mentioned above that I used for reference
- ModMyPi
- Software Utilities:
Please retweet if you enjoyed this post ...
Blogged: "Kubernetes and .NET running on a Raspberry Pi Cluster" https://t.co/70qEBYkvqT #k8s #RaspberryPi #Docker pic.twitter.com/t9LHO30SmV
— Dan Clarke (@dracan) May 14, 2019
Comments